Clarisse Designs’ Makeup Tips for Wedding Makeup

For this weeks #MakeupMonday we are going to show you a great eye makeup look you can try out for your special day! This is even great for those of you who will be attending the wedding as well! This look is perfect because the pink based shadow will brighten up your eyes and make them appear larger which is great for all those photos you will be taking! I put together a quick and easy polyvore tutorial for you to refer back to!


The tarte bride’s essential kit is a must have for this wedding season! It comes with everything a bride will need for her big day! You will also want Benefits They’re Real liner for its great waterproof qualities and ease of a winged eye liner!

What are your favorite wedding makeup must haves? Be sure to share them below! We love hearing from you!

Tips for What Hair Styles to Wear With Your Prom Gown

When it comes to prom,  you everything can so hectic that you wind up picking a hairstyle that doesn’t work for your gown. Here are 6 different style gowns and what hair would look great with them! Don’t be afraid to have fun and try something new!


When you have a scoop neck or an illusion neck like Style 2532 you can pretty much go with anything. My two picks for this style is either have your hair down in glamour curls or have an updo that is leaning towards the side.

Having a one shoulder gown like Style 2375 it is a different story. You want to pull you hair to side with the open shoulder. My favorite go to side hair style is a side braid. There are so many great options that you will love! The side pony also allows you to see any great back detail that is going on!

When you have a strapless gown like Style 2572 you can wear you hair all down! A great hairstyle that looks like you hair is all down but has something a little extra going on is the one shown above. You get a little poof and a fabulous braid with the loo that you hair is all down because the front part isn’t pulled up and is left down. If you have boho strapless style gown like Style 2588 you can throw on a great flower crown!

When you have a higher neck or a v neck like Style 2513  you want to go with something that is half up half down. I love a great braid style that is half up half down like the one above! This hairstyle is different because all the hair in the front is pulled back.


When you have amazing back detail, and illusion back or and open back like Styles 4507 and  2503 you want an amazing up do like the one above!

If you have a plunging neckline like Style 2501 you can do almost anything that was mentioned above, but my favorite is pulling one side up and clipping it to the side. That’s what I did with my plunging neckline dress and I loved it

IMG_0863Those are my tips for choosing what hairstyle to get with your prom gown! Hope they help!

xxTara

Clarisse Designs Makeup Tips for Body Makeup

#MakeupMonday: Clarisse Designs Makeup Tips for Body Makeup

This weeks #MakeupMonday  is all about body makeup. You  many think your face is the only thing that needs prep and makeup but your body is just as important and needs some prep and makeup.

Step 1: Exfoliate 


Before you do anything you want to make sure your skin is prepped by using a gentle exfoliator. As I mentioned last week, Ocean Salt from LUSH  is my all time favorite exfoliator. It is gentle on the skin and smells fabulous! This can not only be used on the face, but it can be used on your body as well! Another great exfoliator I forgot to mention last week is from Philosophy called Microdelivery Exfoliating Wash. This can also be used on both the face and the body. If you looking for something that is for the body only, Philosophy makes some exfoliating body washes as well that can be found on QVC every so often.

Step 2: Moisturize


Just like your face you want to start with a soft smooth canvas so you need to use a moisturizer.  Some great tanners that double as moisturizers are St. Tropez Essentials Self Tan Dry Oil, and tarte Brazilliance™ Skin Rejuvenating Maracuja Face And Body Self Tanner.

Step 3: Apply Body Makeup

Next you want to apply the “foundation” to your body. This is so the skin becomes even and seamless! You want your body to look gorgeous in photos too right?! My number one pic is Urban Decays’s Naked Skin Body Beauty Balm. One it’s shorts season I whip this baby right out. It is just like the beauty balm for your face but is specialized for your body. It also has a little shimmer in it to make you skin luminous! Another great option is from NARS called Body Glow. This is great if you want a product that does multiple things. You an skip buying a separate moisturizer, tanner, body makeup, and illuminator. This baby has it all! It’s a dry tanning oil that moisturizers, tans, evens skin ton and has a shimmer!

Step 4: Coverage (Optional)

This step is optional but if you have an imperfections on your body that you don’t want showing or have any blemishes on your body, you can opt for a high coverage concealer. My favorites are from Urban Decay and Kan Von D. They are Naked Skin Weightless Complete Coverage and Lock It Tattoo Coverup. Both are great for covering anything on the body.

Step 5: Contouring and Highlighting (Optional)

Contouring is another great step that is totally optional. If you want to make your cleavage and collar bone stand out you can contour and highlight with powder bronzers and highlighters. My favorite kit to contour on the body is from Too Faced called Cocoa Contoured to Perfection. This has everything you need to be a contouring queen! Stay away from liquids because it will just melt and get all over your gown.

Tips for Where to use Body Makeup: 

Apply after you put your dress on and be extra careful if your gown is white.

Rule of thumb: Only apply to the areas that are showing.

Strapless Dress: Apply onto the arms, chest and the back.

Halter: Apply to the arms. If your back is out then apply to the back. If there’s any key holes you can apply to open ares if you want.

Open Back: Get a friend to help you out and apply to the back.

High Slit or Short Dress: Apply all over the legs. Apply after you put on your gown so it doesn’t get all over it. Wait for everything to dry before you lower your gown if you have a slit.

Sleeveless: Just apply to the arms.

If there’s not a high slit you can skip applying to your legs.

Now not only will your face be makeup and photo ready, but your body will be too!

Happy #MakeupMonday!

xxTara

Negative Space Mani’s that are Perfect for Prom

#ManiMonday: Negative Space Mani’s that are Perfect for Prom

It’s Monday and that means another #ManiMonday! One of my favorite Spring Nail Trends is the Negative Space trend! Here are 5 great designs that will be great for your prom look! Prom is getting even closer so best to start planning your nail ideas now!

5c1511e01e7dd0fa37fd2a90f1a7a561

This first design is just darling and will look fabulous with any gown! Instead of the black you can go with any color that will match or go with your gown!

8e23ab8f07f7b83ded0ccc1afe5e709c

I love this design! You can use just about any color and you can add rhinestones or glitter!


Tip: If you want to add rhinestones and glitter and you’re getting your nails done at a salon make sure you don’t go too early if it’s your natural nails. The glitter chips easily if it’s loose and the rhinestones come loose easily as well.

Untitled

When it comes to negative space nail art, there are many triangle design you can go with. There is the one above that makes a great choice for prom. Of the design is too much for you, you can do 4 of your nails solid and the design on your ring finger. You can even add some glitter to your pointer finger to add some sparkle!

Untitled2

Here is another great triangle design with the negative space! This is great if you have shorter nails since you don’t need a lot of space for the design!


Tip: When you find a design and you don’t totally like it, just change the parts you don’t like. Get creative and have fun. You don’t have to use the same colors and mix and match different designs.

I’ve been a fan of this design when Ashley Tisdale posted it on her instagram, and now here it is again with negative space and I love it even more! You can even do the design with glitter instead of a solid color to add a pop of sparkle!


Show us what mani you’re rocking with the #ClarisseBlog on Instagram !


xxTara

Clarisse Designs Makeup Tips for How to Get Your Skin Makeup Ready for Prom

#MakeupMonday: Clarisse Designs Makeup Tips for How to Get Your Skin Makeup Ready for Prom

It’s #MakeupMonday and this week I am going to give you some tips for how to get your skin makeup ready for prom!

  1. Remove your makeup with a hot washcloth every night before you go to bed using a makeup remover wash.

I know I am guilty of not washing my makeup off every night but this is must for makeup ready skin for prom night. If a wash cloth is too hard on your skin try using it once a week or every other night. My go to makeup remover wash is Philosophy’s Purity.Another great pick is Bliss’ Lid+Lash Wash Makeup Remover.


2. Wash your skin with an acne fighting face wash after you remove your makeup.

Even if you aren’t showing signs of acne you always want to prevent them so you can feel your best the night of prom. My all time favorite face wash Neutrogena Oil-Free Stress Control. Another favorite of mine is from Philosophy called Clear Days Ahead.


Tip: Use an oil free face wash and makeup remover if you have oily skin. If you have dry skin use an oil based remover and face wash. A great option for an oil wash is from Josie Maran.


Use toner water on your skin after you wash.

This is step I never used to follow until I found Tea Tree Toner Water from LUSH. This toner helps brighten my skin making it look awake while helping to fight my acne, especially whiteheads. Toners help prep the skin for a moisturizer and takes off excess facial cleanser. LUSH is the only brand that has toner water I like Their toners are great for when you don’t want to fully wash your skin before going to bed. You can just remove your makeup and give your face a few squirts, wipe it off and hop into bed! Another great toner water I like from them is Breath of Fresh Air.


  1.  Use a moisturizer every night after you wash your skin and every morning.

Moisturizing your skin is so important. I can’t stress this enough. Even when your skin is oily you still need a moisturizer. My new favorite oil free moisturizer is from Philosophy called Clear Days Ahead™ Oil-Free Salicylic Acid Acne Treatment & Moisturizer. If you need oil in your skin try Joise Maran Argan Oil.


5. Exfoliate once a week.

Exfoliating is just as important as washing your skin because exfoliating takes off the dead skin and allows you to start with fresh skin. Sometimes exfoliating once a week can be too much so if this is the case try it every 2 weeks or once a month. My all time favorite exfoliator is from LUSH called Ocean Salt. It can be used all over your body as well!


  1. Lastly, if you have pimples DO NOT pop them!


Popping pimples might seem like a quick fix but in reality you are just spreading the bacteria. By spreading the bacteria you allow more pimples to surface as well as scarring.


Just follow these 6 tips and you will not only be makeup ready, but picture ready! Happy #MakeupMonday!


Clarisse Designs Makeup Tips for Picking Your Eye Makeup for Prom

#MakeupMonday: Clarisse Designs Makeup Tips for Picking Your Eye Makeup for Prom

This week’s #MakeupMonday is all about knowing what eye makeup to use for your prom dress!

In last week’s post I discussed how important it is to wear makeup on the night of your prom, even if you don’t wear it, because you want your face to stand out in the pictures. You want to be the one wearing the dress, not the other way around. The 3 eyeshadow looks I recommend are a Natural Eye, a Golden Smokey Eye, or a traditional Smokey Eye.

Before you chose your look you want to ask yourself a few questions first.

  1. Do you wear a lot of eye makeup on a daily basis?
  2. Are you used to seeing yourself with a lot of eye makeup?
  3. What color is your dress?

If you answered no to the first two questions I recommend going with a natural eye. So many companies have launched a natural eye palette. The big trend for this spring for eyeshadows is brown so you’ll still be right on trend. Some palettes I recommend are Stila’s Nouveau Natural Eye Shadow Palette and Too Faced Natural Eye Neutral Eye Shadow Collection.


Here is a great tutorial I put together for you guys on a simple natural eye shadow look.

If you answered no to the first question and yes to the second question and said your dress is a pastel color or a neutral color then you want to go with a golden smokey eye.

This is right on trend and won’t take away from your natural beauty. (Another good look you can try is our Fun and Flirty look from our V-day Makeup Tutorial). Note: If you have a darker colored dress but aren’t used to seeing yourself with a lot of makeup you can still do a golden smokey eye.

My two favorite pallets for a golden smokey eye are Urban Decay’s Naked Palette  and Smashbox’s Full Exposure Palette.


To get a tutorial on how to do a golden smokey eye, you can watch my video tutorial below or check out this easy step by step picture tutorial I put together.


Lastly, if you answered yes to questions 1 & 2 and you said your dress is a darker color, especially black, there are hints of black or darker colors you can go with a traditional smokey eye if a golden one isn’t your thing.


My favorite pallets to get a smokey eye are again Smashbox’s Full Exposure Palette and Kat Von D’s Interstellar Palette.


Here is great picture tutorial I put together for you guys if you want to go with a smokey eye!

Prom is only weeks away so start planning your eye makeup look soon!! A helpful tip, test out your eye makeup with your dress days or weeks in advance so you know what will make you and your dress shine the most!


Happy #MakeupMonday!!


xxTara

Mani Monday Marc Jacobs Inspiration

As you know from the Valentine’s Day Nail post, I love a good manicure. And what makes a manicure even better is a great fun design! So for this week I thought I would share some of my favorite nail art go to’s inspired by Marc Jacobs products.


To start off our Marc Jacobs Mani Monday Inspiration we are going to go with his signature scent Daisy. This design is great for the girl who loves something simple but wants to add a nice elegant fun flower design to her nails.


To amp up the traditional Marc Jacobs Daisy design we can go with the Marc Jacobs Black Bottle Version of the scent Daisy. If you want something a little more fun and playful you can go with this great stripe design that was also inspired by the Black Bottle Daisy Perfume.


Two other designs you can try based off of Marc Jacobs Perfume are these two pictured above! The design inspired by Marc Jacobs Honey offers a nice fun design that would be great for the spring or summer. It can even be great to help you get over the winter blues, especially now with the weather we are having now on the East Coast! If you want something a little more subdued you can go with the design inspired by the Marc Jacobs Scent Dot! The polka dots add a nice fun touch to this simple design!


If you want to get really fun with your nails you can use the Marc Jacobs Animals for some fun designs! Below are two of my favorites! I loved the design to the right so much I tried it out myself over the summer!


Below are two more designs that you can try out that feature the Marc Jacobs dog. I tried the design on the left and everyone loved it! If you want something with the Marc Jacobs Dog but don’t want to go too crazy with the designs you can try out the design pictured below on the right. This is nice a simple design with just the right amount of fun!


These are just some of the great Marc Jacobs Nail Designs you can find floating around on Pinterest & Instagram! Feel free to make the designs your own and just have fun with your nail art! The design possibilities are endless!


Show us your favorite Mani Monday looks in the comment section below!!


Happy Mani Monday!!

V-day Nail Art

Valentine’s Day tends to be the most hated holiday of the year for most single women out there. Most women feel like this


I’m extremely fortunate and have the best boyfriend a girl could ask for and still find the holiday somewhat annoying because I’ve worked at Edible Arrangements as holiday help for the past 3 years.  By the time the holiday is over I hate strawberries, can’t stand the smell of chocolate and want to punch every heart shaped balloon I see. But there is one way to make the holiday a little less painful, by getting your nails done! I mean, who doesn’t love a good fresh mani?!  I know I sure do!  Here are some of my favorites.


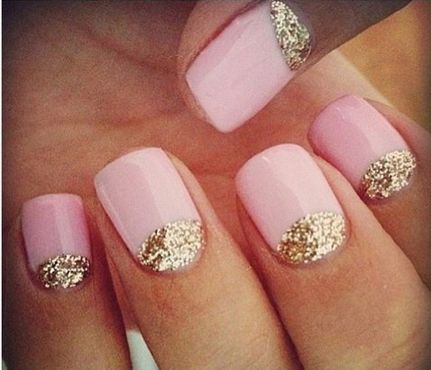
Tip: If you’re trying this design out on your own, buy some binder hole stickers to help make the half moon shape. First paint your on your glitter, then take one of the stickers and place it onto your nail where you want the top of the half moon to begin and then paint on the solid color. This will help you get the nice arch without all the fuss. If your glitter isn’t coming on the way you want, try buying either nail wraps that are glitter or the Sally Hanson Salon Effects in any pattern or glitter you prefer.

2a744a61b905d37cd8576c92d366f97e

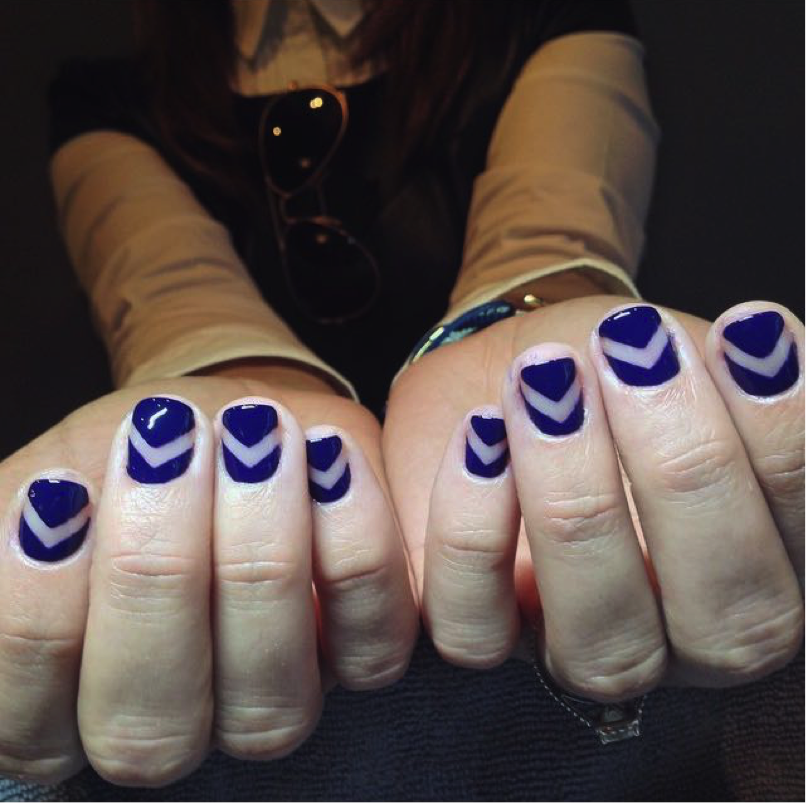
This design is great for the girl who’s not into all the hearts and doesn’t want her nails to scream Valentine’s Day. You can even do a variation of the design and swap out the pink for red or the gold glitter for silver glitter.

59fbb76e2777f2c100fceca5cfce34d0

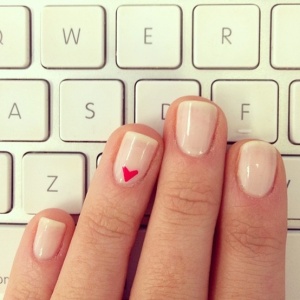
This is PERFECT if you want something simple and elegant! If you like the idea but you’re the kind of girl who likes to have a little more fun with her manis, try adding glitter to your pointer finger or swap out the neutral color for something that stands out a little more.

5ae423ad16320ee967914af8d9b7342e

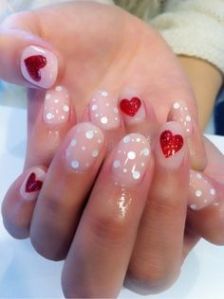
I personally love this design and might try this out when I get my nails done! This is great if you want something a little funky but still neutral. The hearts aren’t overwhelming and the polka dots are just adorable! They add a little extra pop to the neutral color.

a36313aa8422f4fe08fb98890b6305bb

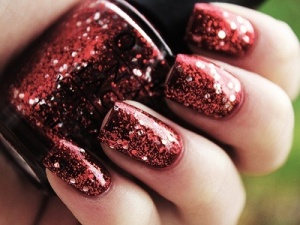
Here is another great idea for those who aren’t into all the heart designs. Glitter is a great way to show your Valentine’s Day spirit without being over the top. If you don’t like the red try a pink glitter or mix in some gold or silver on the ring finger.

Tip: if you’re going for glitter and you have natural nails and want the glitter to last longer, find a base color that matches the color of the glitter and then find the glitter in nail polish form. If you decide to use actual glitter on natural nails when getting a gel mani it tends to chip faster.


These designs are great if you want something fun and simple! The design on the left is the one I tried out last year and it came out great! It’s simple but fun and everyone loved it! You can even try it out in different colors or add rhinestones or glitter to the index finger.  The envelope design is another fun and simple go to! If the envelope design is too much you can always try this out with the envelope on your ring finger and a solid color on all the rest
ad2bbccfc324773f4dd6d752fd11ffa0

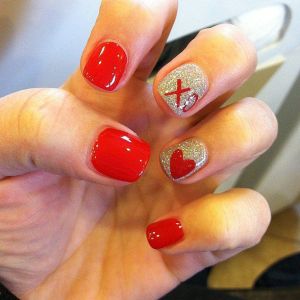
I love this design for the girl who wants their nails to stand out. You have that nice bright bold red and then the shimmer of the silver to catch people’s attention. These nails will definitely be noticed by your valentine!


If you’re not the kind of girl to go get her nails done or try the designs out for yourself you can always use nail wraps! They are great and generally last a decent amount of time.  When I personally tried them they lasted for about a week and a half.  These by ncLA are just perfect for Valentine’s Day!

Tip: If you want your nail wraps to last as long as mine did use a base coat before you apply them. Make sure your nails are completely dry before you apply the nail wraps. After you apply your nail wraps finish them off with a top coat.

Whether you have a wonderful boyfriend or are going to be spending this Valentine’s Day with Ben & Jerry instead, why not have some fabulous nails and just enjoy life. Be your own valentine and treat yourself to a spa day!

Happy Valentine’s Day!